> ## Documentation Index
> Fetch the complete documentation index at: https://docs.polymarket.com/llms.txt
> Use this file to discover all available pages before exploring further.
# Wallets and Authentication
> Connect or create a Polymarket account for trading.
Start by identifying the account's wallet type. You can then connect an existing Polymarket account or create new accounts for your users.
## Wallet Types
A Deposit Wallet is the default smart wallet for trading on Polymarket. Your wallet type depends on how and when the account wallet was created.
| Wallet type | When it applies |
| ------------------ | -------------------------------------------------------------------------------------------- |
| **Deposit Wallet** | All Polymarket account wallets deployed on or after May 4, 2026 use it. |
| **Proxy Wallet** | A legacy smart wallet created through Magic Link or Google authentication on polymarket.com. |
| **Safe Wallet** | A legacy smart wallet created with an external signer such as MetaMask or Rabby Wallet. |
## Connect Your Account
Connect an existing polymarket.com account to trade with its funds and positions. Copy the account wallet address from the profile menu:
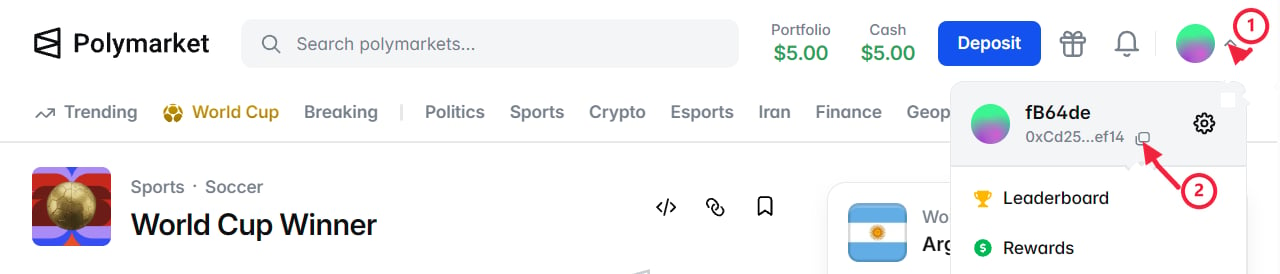
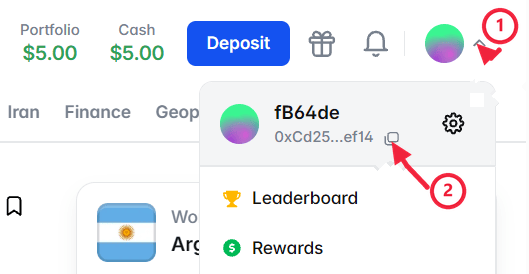 Create a Relayer API key under polymarket.com → Settings → API Keys → Relayer API Keys:
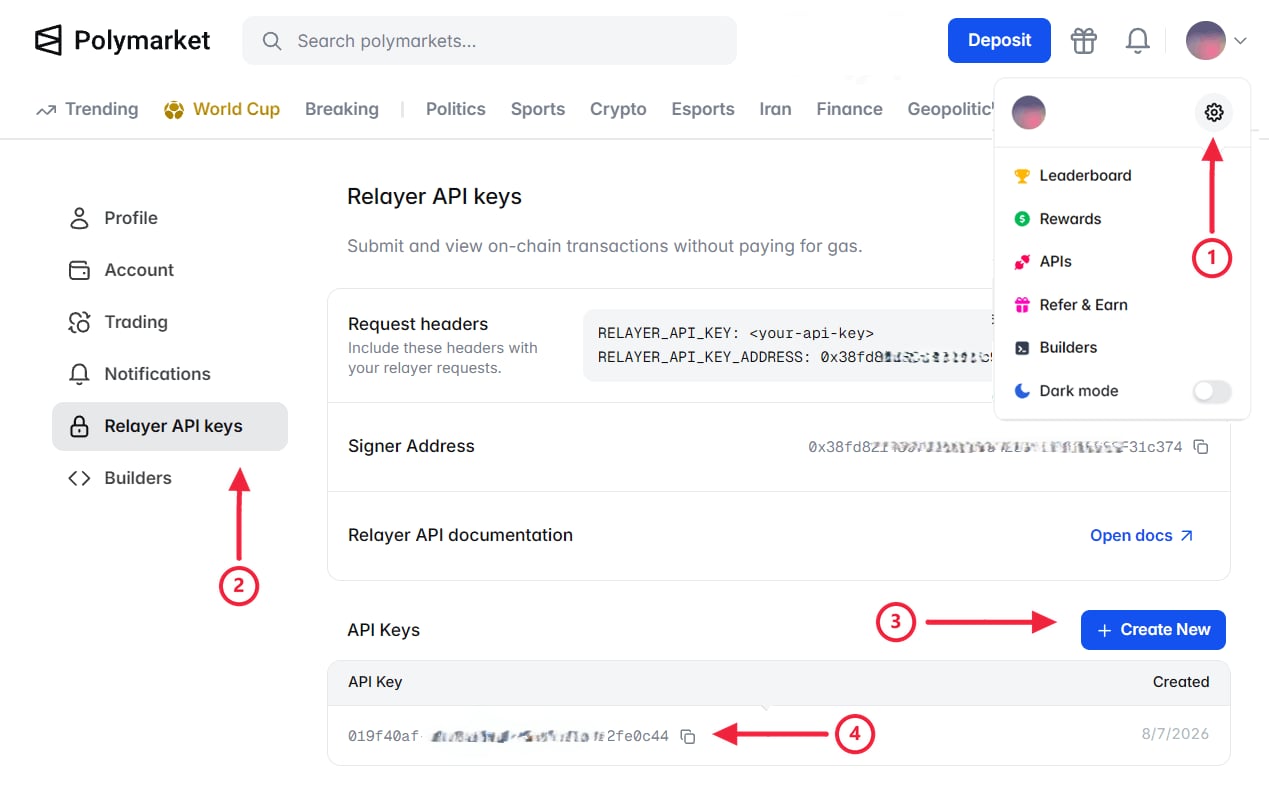 This key authorizes gasless wallet operations for the account. Copy the **Signer Address** and **API Key** shown after creation.
With the wallet address and Relayer API key ready, connect the account with
`createSecureClient`.
First, provide the signer and account wallet. Include the Relayer API
key to authorize gasless wallet operations.
```ts theme={null}
import { createSecureClient, relayerApiKey } from "@polymarket/client";
import { privateKey } from "@polymarket/client/viem";
const client = await createSecureClient({
wallet: process.env.POLYMARKET_WALLET_ADDRESS,
signer: privateKey(process.env.SIGNER_PRIVATE_KEY),
apiKey: relayerApiKey({
key: process.env.RELAYER_API_KEY!,
address: process.env.RELAYER_API_KEY_ADDRESS!,
}),
});
```
This example uses Viem with a private key. See [Wallet
Integrations](/getting-started/typescript#wallet-integrations) to connect a
signer from another supported wallet library.
Then, inspect the resolved account identity and wallet type.
`client.account` contains the signer, account wallet, and wallet type for the session.
```ts AccountIdentity Type theme={null}
type AccountIdentity = {
signer: EvmAddress;
wallet: EvmAddress;
walletType: WalletType;
};
enum WalletType {
EOA = 0,
POLY_PROXY = 1,
GNOSIS_SAFE = 2,
DEPOSIT_WALLET = 3,
}
```
```json AccountIdentity Example theme={null}
{
"signer": "0x8f3cf7ad23cd3cadbd9735aff958023239c6a063",
"wallet": "0x2e234dae75c793f67a35089c9d99245e1c58470b",
"walletType": 3
}
```
That's it—you have connected your account.
With the wallet address and Relayer API key ready, connect the account with
`AsyncSecureClient.create` (`SecureClient.create` is available for
synchronous workflows).
First, create an `AsyncSecureClient` or `SecureClient` with the private
key and account wallet.
Include the Relayer API key to authorize gasless wallet operations.
```python Async theme={null}
import os
from polymarket import AsyncSecureClient, RelayerApiKey
client = await AsyncSecureClient.create(
private_key=os.environ["SIGNER_PRIVATE_KEY"],
wallet=os.environ["POLYMARKET_WALLET_ADDRESS"],
api_key=RelayerApiKey(
key=os.environ["POLYMARKET_RELAYER_API_KEY"],
address=os.environ["POLYMARKET_RELAYER_API_KEY_ADDRESS"],
),
)
```
```python Sync theme={null}
import os
from polymarket import RelayerApiKey, SecureClient
client = SecureClient.create(
private_key=os.environ["SIGNER_PRIVATE_KEY"],
wallet=os.environ["POLYMARKET_WALLET_ADDRESS"],
api_key=RelayerApiKey(
key=os.environ["POLYMARKET_RELAYER_API_KEY"],
address=os.environ["POLYMARKET_RELAYER_API_KEY_ADDRESS"],
),
)
```
Then, inspect the resolved account wallet and wallet type.
`client.wallet` and `client.wallet_type` contain the resolved account wallet and wallet type for the session.
```python Async theme={null}
EvmAddress = NewType("EvmAddress", str)
WalletType: TypeAlias = Literal["EOA", "POLY_PROXY", "GNOSIS_SAFE", "DEPOSIT_WALLET"]
class AsyncSecureClient:
wallet: EvmAddress
wallet_type: WalletType
```
```python Sync theme={null}
EvmAddress = NewType("EvmAddress", str)
WalletType: TypeAlias = Literal["EOA", "POLY_PROXY", "GNOSIS_SAFE", "DEPOSIT_WALLET"]
class SecureClient:
wallet: EvmAddress
wallet_type: WalletType
```
That's it—you have connected your account.
Authenticate with the CLOB and create L2 credentials.
First, create an L1 signature to attest to ownership of the signer
address. See [API Authentication](/getting-started/api#authentication)
for the complete signing flow.
```json clobAuthTypedData theme={null}
{
"domain": {
"name": "ClobAuthDomain",
"version": "1",
"chainId": 137
},
"types": {
"ClobAuth": [
{ "name": "address", "type": "address" },
{ "name": "timestamp", "type": "string" },
{ "name": "nonce", "type": "uint256" },
{ "name": "message", "type": "string" }
]
},
"primaryType": "ClobAuth",
"message": {
"address": "",
"timestamp": "",
"nonce": "",
"message": "This message attests that I control the given wallet"
}
}
```
Sign `clobAuthTypedData` with the signer that controls
``. The returned signature is ``.
Then, create L2 credentials by sending the signer address, timestamp,
nonce, and L1 signature to the CLOB.
```bash Create theme={null}
curl -X POST "https://clob.polymarket.com/auth/api-key" \
-H "POLY_ADDRESS: " \
-H "POLY_SIGNATURE: " \
-H "POLY_TIMESTAMP: " \
-H "POLY_NONCE: "
```
```bash Derive theme={null}
curl "https://clob.polymarket.com/auth/derive-api-key" \
-H "POLY_ADDRESS: " \
-H "POLY_SIGNATURE: " \
-H "POLY_TIMESTAMP: " \
-H "POLY_NONCE: "
```
Store the returned L2 credentials for authenticating private requests,
including requests that place orders:
```json Response theme={null}
{
"apiKey": "",
"secret": "",
"passphrase": ""
}
```
That's it—you have connected your account.
## Create New Accounts
Create a polymarket.com account to serve as your builder account. It represents your integration and owns the builder profile and API credentials used to create Deposit Wallets for your users. Each wallet remains controlled by its signer.
In the builder account, open polymarket.com → Settings → Builders and create an API key:
This key authorizes gasless wallet operations for the account. Copy the **Signer Address** and **API Key** shown after creation.
With the wallet address and Relayer API key ready, connect the account with
`createSecureClient`.
First, provide the signer and account wallet. Include the Relayer API
key to authorize gasless wallet operations.
```ts theme={null}
import { createSecureClient, relayerApiKey } from "@polymarket/client";
import { privateKey } from "@polymarket/client/viem";
const client = await createSecureClient({
wallet: process.env.POLYMARKET_WALLET_ADDRESS,
signer: privateKey(process.env.SIGNER_PRIVATE_KEY),
apiKey: relayerApiKey({
key: process.env.RELAYER_API_KEY!,
address: process.env.RELAYER_API_KEY_ADDRESS!,
}),
});
```
This example uses Viem with a private key. See [Wallet
Integrations](/getting-started/typescript#wallet-integrations) to connect a
signer from another supported wallet library.
Then, inspect the resolved account identity and wallet type.
`client.account` contains the signer, account wallet, and wallet type for the session.
```ts AccountIdentity Type theme={null}
type AccountIdentity = {
signer: EvmAddress;
wallet: EvmAddress;
walletType: WalletType;
};
enum WalletType {
EOA = 0,
POLY_PROXY = 1,
GNOSIS_SAFE = 2,
DEPOSIT_WALLET = 3,
}
```
```json AccountIdentity Example theme={null}
{
"signer": "0x8f3cf7ad23cd3cadbd9735aff958023239c6a063",
"wallet": "0x2e234dae75c793f67a35089c9d99245e1c58470b",
"walletType": 3
}
```
That's it—you have connected your account.
With the wallet address and Relayer API key ready, connect the account with
`AsyncSecureClient.create` (`SecureClient.create` is available for
synchronous workflows).
First, create an `AsyncSecureClient` or `SecureClient` with the private
key and account wallet.
Include the Relayer API key to authorize gasless wallet operations.
```python Async theme={null}
import os
from polymarket import AsyncSecureClient, RelayerApiKey
client = await AsyncSecureClient.create(
private_key=os.environ["SIGNER_PRIVATE_KEY"],
wallet=os.environ["POLYMARKET_WALLET_ADDRESS"],
api_key=RelayerApiKey(
key=os.environ["POLYMARKET_RELAYER_API_KEY"],
address=os.environ["POLYMARKET_RELAYER_API_KEY_ADDRESS"],
),
)
```
```python Sync theme={null}
import os
from polymarket import RelayerApiKey, SecureClient
client = SecureClient.create(
private_key=os.environ["SIGNER_PRIVATE_KEY"],
wallet=os.environ["POLYMARKET_WALLET_ADDRESS"],
api_key=RelayerApiKey(
key=os.environ["POLYMARKET_RELAYER_API_KEY"],
address=os.environ["POLYMARKET_RELAYER_API_KEY_ADDRESS"],
),
)
```
Then, inspect the resolved account wallet and wallet type.
`client.wallet` and `client.wallet_type` contain the resolved account wallet and wallet type for the session.
```python Async theme={null}
EvmAddress = NewType("EvmAddress", str)
WalletType: TypeAlias = Literal["EOA", "POLY_PROXY", "GNOSIS_SAFE", "DEPOSIT_WALLET"]
class AsyncSecureClient:
wallet: EvmAddress
wallet_type: WalletType
```
```python Sync theme={null}
EvmAddress = NewType("EvmAddress", str)
WalletType: TypeAlias = Literal["EOA", "POLY_PROXY", "GNOSIS_SAFE", "DEPOSIT_WALLET"]
class SecureClient:
wallet: EvmAddress
wallet_type: WalletType
```
That's it—you have connected your account.
Authenticate with the CLOB and create L2 credentials.
First, create an L1 signature to attest to ownership of the signer
address. See [API Authentication](/getting-started/api#authentication)
for the complete signing flow.
```json clobAuthTypedData theme={null}
{
"domain": {
"name": "ClobAuthDomain",
"version": "1",
"chainId": 137
},
"types": {
"ClobAuth": [
{ "name": "address", "type": "address" },
{ "name": "timestamp", "type": "string" },
{ "name": "nonce", "type": "uint256" },
{ "name": "message", "type": "string" }
]
},
"primaryType": "ClobAuth",
"message": {
"address": "",
"timestamp": "",
"nonce": "",
"message": "This message attests that I control the given wallet"
}
}
```
Sign `clobAuthTypedData` with the signer that controls
``. The returned signature is ``.
Then, create L2 credentials by sending the signer address, timestamp,
nonce, and L1 signature to the CLOB.
```bash Create theme={null}
curl -X POST "https://clob.polymarket.com/auth/api-key" \
-H "POLY_ADDRESS: " \
-H "POLY_SIGNATURE: " \
-H "POLY_TIMESTAMP: " \
-H "POLY_NONCE: "
```
```bash Derive theme={null}
curl "https://clob.polymarket.com/auth/derive-api-key" \
-H "POLY_ADDRESS: " \
-H "POLY_SIGNATURE: " \
-H "POLY_TIMESTAMP: " \
-H "POLY_NONCE: "
```
Store the returned L2 credentials for authenticating private requests,
including requests that place orders:
```json Response theme={null}
{
"apiKey": "",
"secret": "",
"passphrase": ""
}
```
That's it—you have connected your account.
## Create New Accounts
Create a polymarket.com account to serve as your builder account. It represents your integration and owns the builder profile and API credentials used to create Deposit Wallets for your users. Each wallet remains controlled by its signer.
In the builder account, open polymarket.com → Settings → Builders and create an API key:
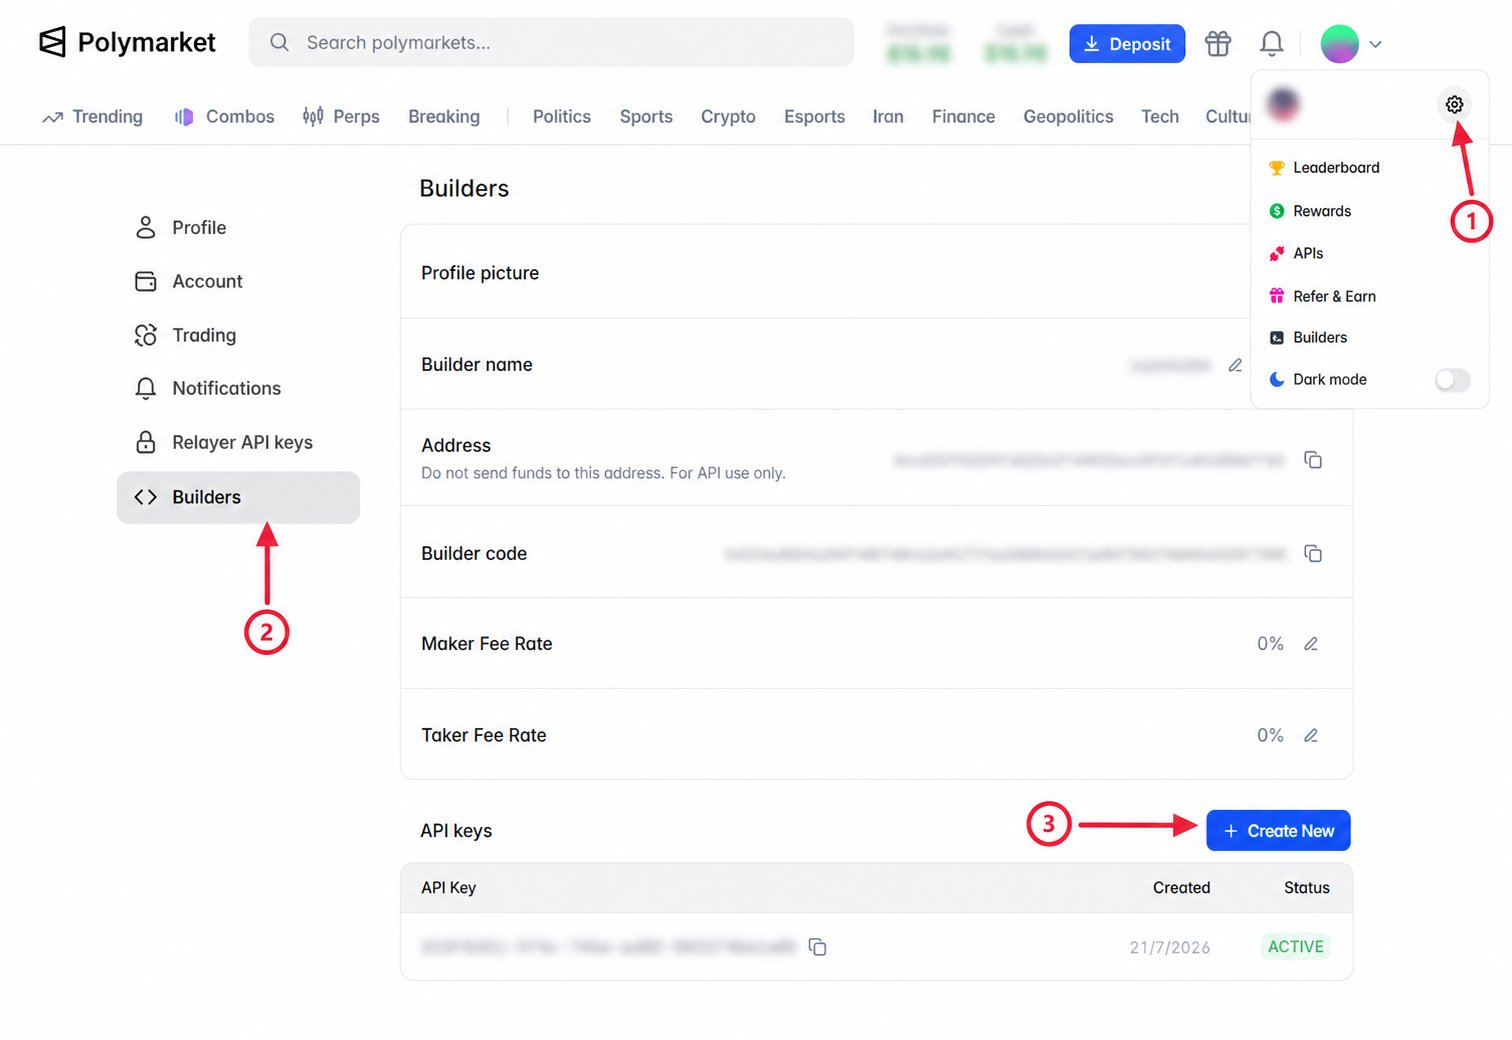
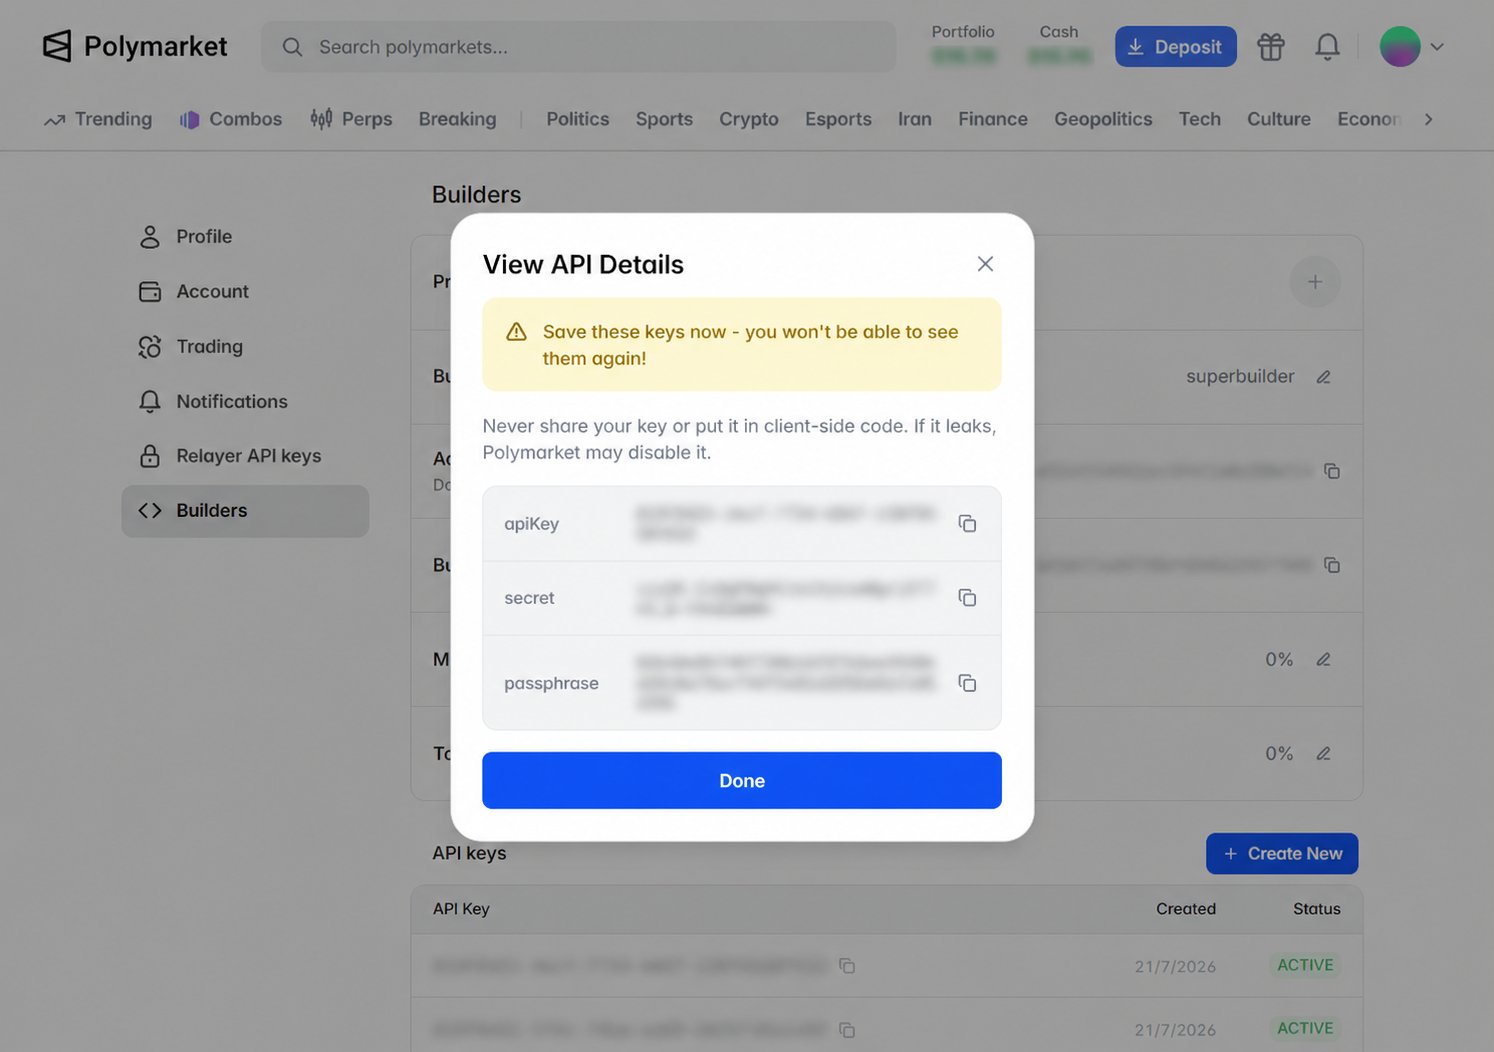 Copy the **API Key**, **Secret**, and **Passphrase** shown after creation.
Builder API credentials are secrets. Keep them on your server, and never
expose or share them.
With the Builder API key ready, create the new account with
`createSecureClient`.
First, create a `SecureClient` with the signer and Builder API key. The SDK
derives the signer's Deposit Wallet address and deploys the wallet
automatically.
```ts theme={null}
import { createSecureClient } from "@polymarket/client";
import { builderApiKey } from "@polymarket/client/node";
import { privateKey } from "@polymarket/client/viem";
const client = await createSecureClient({
signer: privateKey(process.env.SIGNER_PRIVATE_KEY),
apiKey: builderApiKey({
key: process.env.POLYMARKET_BUILDER_API_KEY!,
secret: process.env.POLYMARKET_BUILDER_SECRET!,
passphrase: process.env.POLYMARKET_BUILDER_PASSPHRASE!,
}),
});
```
This example uses Viem with a private key. See [Wallet
Integrations](/getting-started/typescript#wallet-integrations) to connect a
signer from another supported wallet library.
Then, inspect the resolved account identity and wallet type.
`client.account` contains the signer, account wallet, and wallet type for the session.
```ts AccountIdentity Type theme={null}
type AccountIdentity = {
signer: EvmAddress;
wallet: EvmAddress;
walletType: WalletType;
};
enum WalletType {
EOA = 0,
POLY_PROXY = 1,
GNOSIS_SAFE = 2,
DEPOSIT_WALLET = 3,
}
```
```json AccountIdentity Example theme={null}
{
"signer": "0x8f3cf7ad23cd3cadbd9735aff958023239c6a063",
"wallet": "0x2e234dae75c793f67a35089c9d99245e1c58470b",
"walletType": 3
}
```
That's it—you have created the new account.
With the Builder API key ready, create the new account with
`AsyncSecureClient.create` (`SecureClient.create` is available for
synchronous workflows).
First, create an `AsyncSecureClient` or `SecureClient` with the private
key and Builder API key.
The SDK derives the signer's Deposit Wallet address and deploys the
wallet automatically.
```python Async theme={null}
import os
from polymarket import AsyncSecureClient, BuilderApiKey
client = await AsyncSecureClient.create(
private_key=os.environ["SIGNER_PRIVATE_KEY"],
api_key=BuilderApiKey(
key=os.environ["POLYMARKET_BUILDER_API_KEY"],
secret=os.environ["POLYMARKET_BUILDER_SECRET"],
passphrase=os.environ["POLYMARKET_BUILDER_PASSPHRASE"],
),
)
```
```python Sync theme={null}
import os
from polymarket import BuilderApiKey, SecureClient
client = SecureClient.create(
private_key=os.environ["SIGNER_PRIVATE_KEY"],
api_key=BuilderApiKey(
key=os.environ["POLYMARKET_BUILDER_API_KEY"],
secret=os.environ["POLYMARKET_BUILDER_SECRET"],
passphrase=os.environ["POLYMARKET_BUILDER_PASSPHRASE"],
),
)
```
Then, inspect the resolved account wallet and wallet type.
`client.wallet` and `client.wallet_type` contain the resolved account wallet and wallet type for the session.
```python Async theme={null}
EvmAddress = NewType("EvmAddress", str)
WalletType: TypeAlias = Literal["EOA", "POLY_PROXY", "GNOSIS_SAFE", "DEPOSIT_WALLET"]
class AsyncSecureClient:
wallet: EvmAddress
wallet_type: WalletType
```
```python Sync theme={null}
EvmAddress = NewType("EvmAddress", str)
WalletType: TypeAlias = Literal["EOA", "POLY_PROXY", "GNOSIS_SAFE", "DEPOSIT_WALLET"]
class SecureClient:
wallet: EvmAddress
wallet_type: WalletType
```
That's it—you have created the new account.
With the Builder API key ready, deploy a Deposit Wallet for each new signer
through the Relayer.
First, prepare a `WALLET-CREATE` request for each new signer.
```json wallet_create_body theme={null}
{
"type": "WALLET-CREATE",
"from": "",
"to": "0x00000000000Fb5C9ADea0298D729A0CB3823Cc07",
"metadata": "Deploy Deposit Wallet"
}
```
Create a Unix timestamp in seconds, then sign the exact serialized request body with the Builder API key `secret`.
```text theme={null}
request_timestamp =
method = "POST"
request_path = "/submit"
message = request_timestamp + method + request_path + wallet_create_body
builder_signature = urlsafeBase64WithPadding(
HMAC-SHA256(base64Decode(), message)
)
```
Then, submit the signed request to the Relayer.
```bash theme={null}
curl -X POST "https://relayer-v2.polymarket.com/submit" \
-H "Content-Type: application/json" \
-H "POLY_BUILDER_API_KEY: " \
-H "POLY_BUILDER_TIMESTAMP: " \
-H "POLY_BUILDER_PASSPHRASE: " \
-H "POLY_BUILDER_SIGNATURE: " \
-d '{
"type": "WALLET-CREATE",
"from": "",
"to": "0x00000000000Fb5C9ADea0298D729A0CB3823Cc07",
"metadata": "Deploy Deposit Wallet"
}'
```
The response includes the Relayer transaction ID.
```json Response theme={null}
{
"transactionID": "",
"state": "STATE_NEW"
}
```
Then, poll the Relayer transaction until it reaches `STATE_CONFIRMED`.
```bash theme={null}
curl "https://relayer-v2.polymarket.com/transaction?id="
```
The confirmed transaction includes the new Deposit Wallet address as `proxyAddress`.
```json Response theme={null}
[
{
"transactionID": "",
"transactionHash": "",
"proxyAddress": "",
"state": "STATE_CONFIRMED"
}
]
```
Treat `STATE_FAILED` and `STATE_INVALID` as terminal failures.
Then, create an L1 signature to attest to ownership of the signer
address. See [API Authentication](/getting-started/api#authentication)
for the complete signing flow.
```json clobAuthTypedData theme={null}
{
"domain": {
"name": "ClobAuthDomain",
"version": "1",
"chainId": 137
},
"types": {
"ClobAuth": [
{ "name": "address", "type": "address" },
{ "name": "timestamp", "type": "string" },
{ "name": "nonce", "type": "uint256" },
{ "name": "message", "type": "string" }
]
},
"primaryType": "ClobAuth",
"message": {
"address": "",
"timestamp": "",
"nonce": "",
"message": "This message attests that I control the given wallet"
}
}
```
Sign `clobAuthTypedData` with the signer that controls ``. The returned signature is ``.
Finally, create L2 credentials by sending the signer address,
timestamp, nonce, and L1 signature to the CLOB.
```bash Create theme={null}
curl -X POST "https://clob.polymarket.com/auth/api-key" \
-H "POLY_ADDRESS: " \
-H "POLY_SIGNATURE: " \
-H "POLY_TIMESTAMP: " \
-H "POLY_NONCE: "
```
```bash Derive theme={null}
curl "https://clob.polymarket.com/auth/derive-api-key" \
-H "POLY_ADDRESS: " \
-H "POLY_SIGNATURE: " \
-H "POLY_TIMESTAMP: " \
-H "POLY_NONCE: "
```
Store the returned L2 credentials for authenticated requests and order placement.
```json Response theme={null}
{
"apiKey": "",
"secret": "",
"passphrase": ""
}
```
That's it—you have created the new account.
## Execute Gasless Transactions
Approve token spending, transfer funds, and manage positions from the account
wallet without paying gas.
`SecureClient` provides named methods for supported wallet actions. Each
method returns a `TransactionHandle`; call `.wait()` to wait for the action
to settle.
Create a `SecureClient` with either a Relayer or Builder API key:
```ts Relayer API Key theme={null}
import { createSecureClient, relayerApiKey } from "@polymarket/client";
const client = await createSecureClient({
signer,
wallet: process.env.POLYMARKET_WALLET_ADDRESS,
apiKey: relayerApiKey({
key: process.env.POLYMARKET_RELAYER_API_KEY!,
address: process.env.POLYMARKET_RELAYER_API_KEY_ADDRESS!,
}),
});
```
```ts Builder API Key theme={null}
import { createSecureClient } from "@polymarket/client";
import { builderApiKey } from "@polymarket/client/node";
const client = await createSecureClient({
signer,
wallet: process.env.POLYMARKET_WALLET_ADDRESS,
apiKey: builderApiKey({
key: process.env.POLYMARKET_BUILDER_API_KEY!,
secret: process.env.POLYMARKET_BUILDER_SECRET!,
passphrase: process.env.POLYMARKET_BUILDER_PASSPHRASE!,
}),
});
```
Use the method that matches the wallet action you want to perform:
| Action | Method | Documentation |
| ------------------------------ | -------------------------- | ----------------------------------------------------- |
| Approve ERC-20 spending | `approveErc20()` | Below |
| Approve an ERC-1155 operator | `approveErc1155ForAll()` | Below |
| Transfer ERC-20 tokens | `transferErc20()` | Below |
| Set up trading approvals | `setupTradingApprovals()` | [Set Up Trading Approvals](#set-up-trading-approvals) |
| Split, merge, or redeem tokens | Position lifecycle methods | [Manage Positions](/trading/positions/manage) |
| Fund a Perps account | `depositToPerps()` | [Fund Your Account](/perps/fund-your-account) |
**Approve ERC-20 spending**
Set an allowance for a contract to spend an ERC-20 token from the account
wallet. Pass `"max"` to approve the maximum amount.
```ts theme={null}
const approval = await client.approveErc20({
tokenAddress: "",
spenderAddress: "",
amount: "max",
});
await approval.wait();
```
**Approve an ERC-1155 operator**
Allow an operator to manage every ERC-1155 token held by the account wallet.
Set `approved` to `false` to revoke access.
```ts theme={null}
const approval = await client.approveErc1155ForAll({
tokenAddress: "",
operatorAddress: "",
approved: true,
});
await approval.wait();
```
**Transfer ERC-20 tokens**
Transfer an ERC-20 token from the account wallet. `amount` is expressed in the
token's base units.
```ts theme={null}
const transfer = await client.transferErc20({
tokenAddress: "",
recipientAddress: "",
amount: 1_000_000n,
});
await transfer.wait();
```
`AsyncSecureClient` provides named methods for supported wallet actions.
Each method returns a transaction handle; call `await handle.wait()` to
wait for the action to settle. The same methods are available on the
synchronous `SecureClient`.
Create an `AsyncSecureClient` with either a Relayer or Builder API key:
```python Relayer API Key theme={null}
import os
from polymarket import AsyncSecureClient, RelayerApiKey
client = await AsyncSecureClient.create(
private_key=os.environ["SIGNER_PRIVATE_KEY"],
wallet=os.environ["POLYMARKET_WALLET_ADDRESS"],
api_key=RelayerApiKey(
key=os.environ["POLYMARKET_RELAYER_API_KEY"],
address=os.environ["POLYMARKET_RELAYER_API_KEY_ADDRESS"],
),
)
```
```python Builder API Key theme={null}
import os
from polymarket import AsyncSecureClient, BuilderApiKey
client = await AsyncSecureClient.create(
private_key=os.environ["SIGNER_PRIVATE_KEY"],
wallet=os.environ["POLYMARKET_WALLET_ADDRESS"],
api_key=BuilderApiKey(
key=os.environ["POLYMARKET_BUILDER_API_KEY"],
secret=os.environ["POLYMARKET_BUILDER_SECRET"],
passphrase=os.environ["POLYMARKET_BUILDER_PASSPHRASE"],
),
)
```
Use the method that matches the wallet action you want to perform:
| Action | Method | Documentation |
| ------------------------------ | --------------------------- | ----------------------------------------------------- |
| Approve ERC-20 spending | `approve_erc20()` | Below |
| Approve an ERC-1155 operator | `approve_erc1155_for_all()` | Below |
| Transfer ERC-20 tokens | `transfer_erc20()` | Below |
| Set up trading approvals | `setup_trading_approvals()` | [Set Up Trading Approvals](#set-up-trading-approvals) |
| Split, merge, or redeem tokens | Position lifecycle methods | [Manage Positions](/trading/positions/manage) |
| Fund a Perps account | `deposit_to_perps()` | [Fund Your Account](/perps/fund-your-account) |
**Approve ERC-20 spending**
Set an allowance for a contract to spend an ERC-20 token from the account
wallet. Pass `"max"` to approve the maximum amount.
```python theme={null}
approval = await client.approve_erc20(
token_address="",
spender_address="",
amount="max",
)
await approval.wait()
```
**Approve an ERC-1155 operator**
Allow an operator to manage every ERC-1155 token held by the account wallet.
Set `approved` to `False` to revoke access.
```python theme={null}
approval = await client.approve_erc1155_for_all(
token_address="",
operator_address="",
approved=True,
)
await approval.wait()
```
**Transfer ERC-20 tokens**
Transfer an ERC-20 token from the account wallet. `amount` is expressed in the
token's base units.
```python theme={null}
transfer = await client.transfer_erc20(
token_address="",
recipient_address="",
amount=1_000_000,
)
await transfer.wait()
```
A Deposit Wallet executes one or more contract calls as an ordered batch.
The signer authorizes the complete batch, and the Relayer submits it
gaslessly.
The following steps show the Deposit Wallet path. For Safe or Proxy Wallet
flows, use an SDK that handles the wallet-specific payloads.
First, encode each contract call and add it to the batch in execution order.
```json theme={null}
[
{
"target": "",
"value": "0",
"data": ""
}
]
```
`target` is the contract to call, `value` is the amount of native POL to send in
wei, and `data` is the ABI-encoded function call. Use `"0"` for `value` when the
call does not transfer POL.
Then, fetch a fresh `WALLET` nonce for the signer using the API key for your
integration.
```bash Relayer API Key theme={null}
curl -G "https://relayer-v2.polymarket.com/v1/account/transactions/params" \
-H "RELAYER_API_KEY: " \
-H "RELAYER_API_KEY_ADDRESS: " \
--data-urlencode "address=" \
--data-urlencode "type=WALLET"
```
```bash Builder API Key theme={null}
curl -G "https://relayer-v2.polymarket.com/v1/account/transactions/params" \
-H "POLY_BUILDER_API_KEY: " \
-H "POLY_BUILDER_TIMESTAMP: " \
-H "POLY_BUILDER_PASSPHRASE: " \
-H "POLY_BUILDER_SIGNATURE: " \
--data-urlencode "address=" \
--data-urlencode "type=WALLET"
```
For Builder API keys, create `builder_signature` from the request timestamp,
method, and path. See [Create New Accounts](#create-new-accounts) for the
complete signing flow.
```json Response theme={null}
{
"address": "",
"nonce": ""
}
```
Build a Deposit Wallet `Batch` containing the wallet address, fresh nonce,
future deadline, and call list.
```json walletBatchTypedData theme={null}
{
"domain": {
"name": "DepositWallet",
"version": "1",
"chainId": 137,
"verifyingContract": ""
},
"types": {
"Call": [
{ "name": "target", "type": "address" },
{ "name": "value", "type": "uint256" },
{ "name": "data", "type": "bytes" }
],
"Batch": [
{ "name": "wallet", "type": "address" },
{ "name": "nonce", "type": "uint256" },
{ "name": "deadline", "type": "uint256" },
{ "name": "calls", "type": "Call[]" }
]
},
"primaryType": "Batch",
"message": {
"wallet": "",
"nonce": "",
"deadline": "",
"calls": [
{
"target": "",
"value": "0",
"data": ""
}
]
}
}
```
Sign the typed data with the signer that controls the Deposit Wallet. The
example below uses Viem.
```ts theme={null}
import { privateKeyToAccount } from "viem/accounts";
const signer = privateKeyToAccount(
process.env.SIGNER_PRIVATE_KEY as `0x${string}`,
);
const walletBatchSignature = await signer.signTypedData(walletBatchTypedData);
```
Submit the signed batch using the same call list and API key for your
integration.
```bash Relayer API Key theme={null}
curl -X POST "https://relayer-v2.polymarket.com/submit" \
-H "Content-Type: application/json" \
-H "RELAYER_API_KEY: " \
-H "RELAYER_API_KEY_ADDRESS: " \
-d '{
"type": "WALLET",
"from": "",
"to": "0x00000000000Fb5C9ADea0298D729A0CB3823Cc07",
"nonce": "",
"signature": "",
"metadata": "",
"depositWalletParams": {
"depositWallet": "",
"deadline": "",
"calls": [
{
"target": "",
"value": "0",
"data": ""
}
]
}
}'
```
```bash Builder API Key theme={null}
curl -X POST "https://relayer-v2.polymarket.com/submit" \
-H "Content-Type: application/json" \
-H "POLY_BUILDER_API_KEY: " \
-H "POLY_BUILDER_TIMESTAMP: " \
-H "POLY_BUILDER_PASSPHRASE: " \
-H "POLY_BUILDER_SIGNATURE: " \
-d '{
"type": "WALLET",
"from": "",
"to": "0x00000000000Fb5C9ADea0298D729A0CB3823Cc07",
"nonce": "",
"signature": "",
"metadata": "",
"depositWalletParams": {
"depositWallet": "",
"deadline": "",
"calls": [
{
"target": "",
"value": "0",
"data": ""
}
]
}
}'
```
For Builder API keys, sign the request timestamp, method, path, and exact
serialized body as described in [Create New Accounts](#create-new-accounts).
The response includes the transaction ID used in the next step.
```json Response theme={null}
{
"transactionID": "",
"state": "STATE_NEW"
}
```
Poll the transaction until it reaches `STATE_CONFIRMED`.
```bash Relayer API Key theme={null}
curl "https://relayer-v2.polymarket.com/v1/account/transactions/" \
-H "RELAYER_API_KEY: " \
-H "RELAYER_API_KEY_ADDRESS: "
```
```bash Builder API Key theme={null}
curl "https://relayer-v2.polymarket.com/v1/account/transactions/" \
-H "POLY_BUILDER_API_KEY: " \
-H "POLY_BUILDER_TIMESTAMP: " \
-H "POLY_BUILDER_PASSPHRASE: " \
-H "POLY_BUILDER_SIGNATURE: "
```
```json Response theme={null}
{
"transaction_id": "",
"transaction_hash": "",
"state": "STATE_CONFIRMED",
"error_msg": null
}
```
Treat `STATE_FAILED` and `STATE_INVALID` as terminal failures.
## Set Up Trading Approvals
Set up the ERC-20 and ERC-1155 approvals that allow Polymarket's exchange
contracts to spend the account wallet's pUSD and Conditional Tokens when
placing orders. For Deposit Wallets, Safe Wallets, and Proxy Wallets, these
approvals are submitted as a gasless transaction.
Create a `SecureClient` with either a Relayer or Builder API key:
```ts Relayer API Key theme={null}
import { createSecureClient, relayerApiKey } from "@polymarket/client";
const client = await createSecureClient({
signer,
wallet: process.env.POLYMARKET_WALLET_ADDRESS,
apiKey: relayerApiKey({
key: process.env.POLYMARKET_RELAYER_API_KEY!,
address: process.env.POLYMARKET_RELAYER_API_KEY_ADDRESS!,
}),
});
```
```ts Builder API Key theme={null}
import { createSecureClient } from "@polymarket/client";
import { builderApiKey } from "@polymarket/client/node";
const client = await createSecureClient({
signer,
wallet: process.env.POLYMARKET_WALLET_ADDRESS,
apiKey: builderApiKey({
key: process.env.POLYMARKET_BUILDER_API_KEY!,
secret: process.env.POLYMARKET_BUILDER_SECRET!,
passphrase: process.env.POLYMARKET_BUILDER_PASSPHRASE!,
}),
});
```
Call `setupTradingApprovals()` to configure the required allowances:
```ts theme={null}
await client.setupTradingApprovals();
```
The method checks existing approvals and submits only what is missing, so it is safe to call more than once.
Order placement can recover from missing allowances automatically. Setting them up in advance keeps that work out of your first order.
Create an `AsyncSecureClient` with either a Relayer or Builder API key (the
same workflow is available with the synchronous `SecureClient`):
```python Relayer API Key theme={null}
import os
from polymarket import AsyncSecureClient, RelayerApiKey
client = await AsyncSecureClient.create(
private_key=os.environ["SIGNER_PRIVATE_KEY"],
wallet=os.environ["POLYMARKET_WALLET_ADDRESS"],
api_key=RelayerApiKey(
key=os.environ["POLYMARKET_RELAYER_API_KEY"],
address=os.environ["POLYMARKET_RELAYER_API_KEY_ADDRESS"],
),
)
```
```python Builder API Key theme={null}
import os
from polymarket import AsyncSecureClient, BuilderApiKey
client = await AsyncSecureClient.create(
private_key=os.environ["SIGNER_PRIVATE_KEY"],
wallet=os.environ["POLYMARKET_WALLET_ADDRESS"],
api_key=BuilderApiKey(
key=os.environ["POLYMARKET_BUILDER_API_KEY"],
secret=os.environ["POLYMARKET_BUILDER_SECRET"],
passphrase=os.environ["POLYMARKET_BUILDER_PASSPHRASE"],
),
)
```
Call `setup_trading_approvals()` to configure the required allowances:
```python theme={null}
await client.setup_trading_approvals()
```
The method checks existing approvals and submits only what is missing, so it is safe to call more than once.
Order placement can recover from missing allowances automatically. Setting them up in advance keeps that work out of your first order.
Configure both CLOB exchange contracts so a Deposit Wallet can buy and sell
in standard and neg-risk markets.
The following steps show the Deposit Wallet path. For Safe or Proxy Wallet
flows, use an SDK that handles the wallet-specific payloads. For EOA trading,
see [Set Up EOA Trading](#set-up-eoa-trading).
First, check each allowance before building the transaction so the batch
contains only missing approvals.
| Token | Contract to approve | Contract call |
| ------------------ | ------------------- | ------------------------------------------- |
| pUSD | Standard Exchange | `approve(StandardExchange, maxUint256)` |
| pUSD | Neg Risk Exchange | `approve(NegRiskExchange, maxUint256)` |
| Conditional Tokens | Standard Exchange | `setApprovalForAll(StandardExchange, true)` |
| Conditional Tokens | Neg Risk Exchange | `setApprovalForAll(NegRiskExchange, true)` |
Read the current values with `allowance(wallet, exchange)` on pUSD and `isApprovedForAll(wallet, exchange)` on Conditional Tokens.
| Contract | Address |
| ------------------ | -------------------------------------------- |
| pUSD | `0xC011a7E12a19f7B1f670d46F03B03f3342E82DFB` |
| Conditional Tokens | `0x4D97DCd97eC945f40cF65F87097ACe5EA0476045` |
| Standard Exchange | `0xE111180000d2663C0091e4f400237545B87B996B` |
| Neg Risk Exchange | `0xe2222d279d744050d28e00520010520000310F59` |
Then, encode the missing ERC-20 and ERC-1155 approval calls.
```solidity ERC-20 Approval theme={null}
function approve(address spender, uint256 amount) returns (bool);
```
```solidity ERC-1155 Approval theme={null}
function setApprovalForAll(address operator, bool approved);
```
Build one call for each missing approval. This example includes all four.
```json theme={null}
[
{
"target": "0xC011a7E12a19f7B1f670d46F03B03f3342E82DFB",
"value": "0",
"data": ""
},
{
"target": "0xC011a7E12a19f7B1f670d46F03B03f3342E82DFB",
"value": "0",
"data": ""
},
{
"target": "0x4D97DCd97eC945f40cF65F87097ACe5EA0476045",
"value": "0",
"data": ""
},
{
"target": "0x4D97DCd97eC945f40cF65F87097ACe5EA0476045",
"value": "0",
"data": ""
}
]
```
Use the approval call list as the `calls` in [Execute Gasless
Transactions](#execute-gasless-transactions). Fetch a fresh nonce, sign the
complete batch, submit it, and wait for `STATE_CONFIRMED` before continuing.
Finally, update the CLOB allowance cache:
```bash Collateral theme={null}
curl -G "https://clob.polymarket.com/balance-allowance/update" \
-H "POLY_ADDRESS: " \
-H "POLY_SIGNATURE: " \
-H "POLY_TIMESTAMP: " \
-H "POLY_API_KEY: " \
-H "POLY_PASSPHRASE: " \
--data-urlencode "asset_type=COLLATERAL" \
--data-urlencode "signature_type=3"
```
```bash Conditional Token theme={null}
curl -G "https://clob.polymarket.com/balance-allowance/update" \
-H "POLY_ADDRESS: " \
-H "POLY_SIGNATURE: " \
-H "POLY_TIMESTAMP: " \
-H "POLY_API_KEY: " \
-H "POLY_PASSPHRASE: " \
--data-urlencode "asset_type=CONDITIONAL" \
--data-urlencode "token_id=" \
--data-urlencode "signature_type=3"
```
Using the signer address and CLOB API credentials from [API
Authentication](/getting-started/api#authentication), create a fresh
`` and generate `` without a request
body. The query parameters are not part of the signed path:
```text theme={null}
message = + "GET" + "/balance-allowance/update"
clob_l2_signature = urlsafeBase64WithPadding(
HMAC-SHA256(base64Decode(), message)
)
```
Refresh the conditional-token allowance for each token before its first sell order.
***
## Advanced Options
Explore additional wallet and authentication patterns for advanced integrations.
### Derive a Deposit Wallet Address
If you need to compute a Deposit Wallet address before deployment, use the
deterministic derivation algorithm below.
Deposit Wallets deployed before the June 29, 2026 upgrade use a UUPS proxy.
Deposit Wallets deployed after the upgrade use a beacon proxy. The following
algorithm derives the address for a new Deposit Wallet with a beacon proxy.
```text theme={null}
factory = 0x00000000000Fb5C9ADea0298D729A0CB3823Cc07
beacon = 0x7A18EDfe055488A3128f01F563e5B479D92ffc3a
walletId = bytes32(signer) // left-pad the signer to 32 bytes
args = abi.encode(factory, walletId)
salt = keccak256(args)
beaconInitCodeHash = SoladyLibClone.initCodeHashERC1967BeaconProxy(beacon, args)
depositWallet = CREATE2(factory, salt, beaconInitCodeHash)
```
See [Contract Addresses](/resources/contracts#wallet-factory-contracts) for the
current Deposit Wallet factory and beacon.
### Set Up EOA Trading
If your EOA is allowlisted for trading, use it as the account wallet. Every
onchain action—including token approvals, ERC-20 transfers, splits, merges, and
redemptions—is submitted directly from the EOA and requires POL for gas.
Pass the signer address as `wallet`. The SDK identifies the account as an
EOA and skips Deposit Wallet deployment.
```ts theme={null}
import { createSecureClient } from "@polymarket/client";
import { privateKey } from "@polymarket/client/viem";
const signer = privateKey(process.env.SIGNER_PRIVATE_KEY);
const client = await createSecureClient({
signer,
wallet: await signer.getAddress(),
});
```
Methods such as `approveErc20()`, `approveErc1155ForAll()`, `transferErc20()`,
and the position lifecycle methods submit transactions directly from the
signer. For example, set up every required trading approval:
```ts theme={null}
await client.setupTradingApprovals();
```
Pass the signer address as `wallet`. The SDK identifies the account as an
EOA and skips Deposit Wallet deployment.
```python theme={null}
import os
from polymarket import AsyncSecureClient
client = await AsyncSecureClient.create(
private_key=os.environ["SIGNER_PRIVATE_KEY"],
wallet=os.environ["POLYMARKET_SIGNER_ADDRESS"],
)
```
Methods such as `approve_erc20()`, `approve_erc1155_for_all()`,
`transfer_erc20()`, and the position lifecycle methods submit transactions
directly from the signer. For example, set up every required trading approval:
```python theme={null}
await client.setup_trading_approvals()
```
First, approve both CLOB exchange contracts to spend pUSD and manage
Conditional Tokens. Submit each required approval transaction from the
EOA and pay gas with POL held at that address.
See [Set Up Trading Approvals](#set-up-trading-approvals) for the required approvals and contract addresses.
Then, create an L1 signature to attest to ownership of the EOA. See [API
Authentication](/getting-started/api#authentication) for the complete
signing flow.
```json clobAuthTypedData theme={null}
{
"domain": {
"name": "ClobAuthDomain",
"version": "1",
"chainId": 137
},
"types": {
"ClobAuth": [
{ "name": "address", "type": "address" },
{ "name": "timestamp", "type": "string" },
{ "name": "nonce", "type": "uint256" },
{ "name": "message", "type": "string" }
]
},
"primaryType": "ClobAuth",
"message": {
"address": "",
"timestamp": "",
"nonce": "",
"message": "This message attests that I control the given wallet"
}
}
```
Sign `clobAuthTypedData` with the EOA. The returned signature is ``.
Finally, create L2 credentials by sending the signer address,
timestamp, nonce, and L1 signature to the CLOB.
```bash Create theme={null}
curl -X POST "https://clob.polymarket.com/auth/api-key" \
-H "POLY_ADDRESS: " \
-H "POLY_SIGNATURE: " \
-H "POLY_TIMESTAMP: " \
-H "POLY_NONCE: "
```
```bash Derive theme={null}
curl "https://clob.polymarket.com/auth/derive-api-key" \
-H "POLY_ADDRESS: " \
-H "POLY_SIGNATURE: " \
-H "POLY_TIMESTAMP: " \
-H "POLY_NONCE: "
```
Store the returned L2 credentials for authenticated requests and order placement.
```json Response theme={null}
{
"apiKey": "",
"secret": "",
"passphrase": ""
}
```
See [Place a Limit Order](/trading/place-orders#place-a-limit-order) for the
complete direct API order flow.
### Remote Builder Signing
Remote Builder Signing keeps Builder API credentials on your server while a TypeScript client requests signed headers for Builder-authenticated actions.
Authenticate and authorize the caller on your server, then sign the request
details supplied by the client.
```ts theme={null}
import { buildHmacSignature } from "@polymarket/client";
export async function POST(request: Request): Promise {
const { body, method, path } = await request.json();
const timestamp = Math.floor(Date.now() / 1000);
return Response.json({
POLY_BUILDER_API_KEY: process.env.POLYMARKET_BUILDER_API_KEY!,
POLY_BUILDER_PASSPHRASE: process.env.POLYMARKET_BUILDER_PASSPHRASE!,
POLY_BUILDER_SIGNATURE: await buildHmacSignature(
process.env.POLYMARKET_BUILDER_SECRET!,
timestamp,
method,
path,
body,
),
POLY_BUILDER_TIMESTAMP: `${timestamp}`,
});
}
```
Pass the user's signer and the signing endpoint to the client. Authenticate
signing requests with the application's session credentials or custom
headers.
```ts Cookie Session theme={null}
import { createSecureClient, remoteBuilderSigning } from "@polymarket/client";
const client = await createSecureClient({
signer,
apiKey: remoteBuilderSigning({
url: "/api/builder/sign",
credentials: "include",
}),
});
```
```ts Custom Headers theme={null}
import { createSecureClient, remoteBuilderSigning } from "@polymarket/client";
const client = await createSecureClient({
signer,
apiKey: remoteBuilderSigning({
url: "/api/builder/sign",
headers: {
Authorization: "Bearer eyJhbGciOiJIUzI1NiJ9.…",
},
}),
});
```
The Builder API credentials remain on the server; the client receives only the headers for the request being authorized.
### Opt Out of Beacon Upgrades
Deposit Wallets deployed after June 29, 2026 use an [ERC-1967 beacon
proxy](https://eips.ethereum.org/EIPS/eip-1967#beacon-contract-address). This
proxy pattern resolves the implementation for multiple wallets through a shared
beacon, allowing Polymarket to send implementation upgrades without changing
their addresses. The wallet owner can instead pin the wallet to the
implementation that is current when it opts out. The owner-only calls below are
submitted directly and require POL for gas.
An opted-out wallet does not receive future security fixes, bug fixes, or
features delivered through beacon upgrades. Review the current implementation
and accept responsibility for maintaining the wallet before opting out.
Send a direct onchain transaction from the wallet owner to call `pause()` on
the Deposit Wallet.
Read `timelockDelay()` from the Deposit Wallet factory and wait until that
interval has elapsed after the wallet was paused.
Send another transaction from the wallet owner to call `optOut()` on the
Deposit Wallet. This pins the wallet to the beacon implementation that is
current when the transaction executes.
Call `unpause()` from the wallet owner to clear the paused state.
To resume receiving beacon upgrades, repeat the pause and timelock steps, call
`optIn()`, and then unpause the wallet. Review the beacon's current default
implementation before opting back in.
Copy the **API Key**, **Secret**, and **Passphrase** shown after creation.
Builder API credentials are secrets. Keep them on your server, and never
expose or share them.
With the Builder API key ready, create the new account with
`createSecureClient`.
First, create a `SecureClient` with the signer and Builder API key. The SDK
derives the signer's Deposit Wallet address and deploys the wallet
automatically.
```ts theme={null}
import { createSecureClient } from "@polymarket/client";
import { builderApiKey } from "@polymarket/client/node";
import { privateKey } from "@polymarket/client/viem";
const client = await createSecureClient({
signer: privateKey(process.env.SIGNER_PRIVATE_KEY),
apiKey: builderApiKey({
key: process.env.POLYMARKET_BUILDER_API_KEY!,
secret: process.env.POLYMARKET_BUILDER_SECRET!,
passphrase: process.env.POLYMARKET_BUILDER_PASSPHRASE!,
}),
});
```
This example uses Viem with a private key. See [Wallet
Integrations](/getting-started/typescript#wallet-integrations) to connect a
signer from another supported wallet library.
Then, inspect the resolved account identity and wallet type.
`client.account` contains the signer, account wallet, and wallet type for the session.
```ts AccountIdentity Type theme={null}
type AccountIdentity = {
signer: EvmAddress;
wallet: EvmAddress;
walletType: WalletType;
};
enum WalletType {
EOA = 0,
POLY_PROXY = 1,
GNOSIS_SAFE = 2,
DEPOSIT_WALLET = 3,
}
```
```json AccountIdentity Example theme={null}
{
"signer": "0x8f3cf7ad23cd3cadbd9735aff958023239c6a063",
"wallet": "0x2e234dae75c793f67a35089c9d99245e1c58470b",
"walletType": 3
}
```
That's it—you have created the new account.
With the Builder API key ready, create the new account with
`AsyncSecureClient.create` (`SecureClient.create` is available for
synchronous workflows).
First, create an `AsyncSecureClient` or `SecureClient` with the private
key and Builder API key.
The SDK derives the signer's Deposit Wallet address and deploys the
wallet automatically.
```python Async theme={null}
import os
from polymarket import AsyncSecureClient, BuilderApiKey
client = await AsyncSecureClient.create(
private_key=os.environ["SIGNER_PRIVATE_KEY"],
api_key=BuilderApiKey(
key=os.environ["POLYMARKET_BUILDER_API_KEY"],
secret=os.environ["POLYMARKET_BUILDER_SECRET"],
passphrase=os.environ["POLYMARKET_BUILDER_PASSPHRASE"],
),
)
```
```python Sync theme={null}
import os
from polymarket import BuilderApiKey, SecureClient
client = SecureClient.create(
private_key=os.environ["SIGNER_PRIVATE_KEY"],
api_key=BuilderApiKey(
key=os.environ["POLYMARKET_BUILDER_API_KEY"],
secret=os.environ["POLYMARKET_BUILDER_SECRET"],
passphrase=os.environ["POLYMARKET_BUILDER_PASSPHRASE"],
),
)
```
Then, inspect the resolved account wallet and wallet type.
`client.wallet` and `client.wallet_type` contain the resolved account wallet and wallet type for the session.
```python Async theme={null}
EvmAddress = NewType("EvmAddress", str)
WalletType: TypeAlias = Literal["EOA", "POLY_PROXY", "GNOSIS_SAFE", "DEPOSIT_WALLET"]
class AsyncSecureClient:
wallet: EvmAddress
wallet_type: WalletType
```
```python Sync theme={null}
EvmAddress = NewType("EvmAddress", str)
WalletType: TypeAlias = Literal["EOA", "POLY_PROXY", "GNOSIS_SAFE", "DEPOSIT_WALLET"]
class SecureClient:
wallet: EvmAddress
wallet_type: WalletType
```
That's it—you have created the new account.
With the Builder API key ready, deploy a Deposit Wallet for each new signer
through the Relayer.
First, prepare a `WALLET-CREATE` request for each new signer.
```json wallet_create_body theme={null}
{
"type": "WALLET-CREATE",
"from": "",
"to": "0x00000000000Fb5C9ADea0298D729A0CB3823Cc07",
"metadata": "Deploy Deposit Wallet"
}
```
Create a Unix timestamp in seconds, then sign the exact serialized request body with the Builder API key `secret`.
```text theme={null}
request_timestamp =
method = "POST"
request_path = "/submit"
message = request_timestamp + method + request_path + wallet_create_body
builder_signature = urlsafeBase64WithPadding(
HMAC-SHA256(base64Decode(), message)
)
```
Then, submit the signed request to the Relayer.
```bash theme={null}
curl -X POST "https://relayer-v2.polymarket.com/submit" \
-H "Content-Type: application/json" \
-H "POLY_BUILDER_API_KEY: " \
-H "POLY_BUILDER_TIMESTAMP: " \
-H "POLY_BUILDER_PASSPHRASE: " \
-H "POLY_BUILDER_SIGNATURE: " \
-d '{
"type": "WALLET-CREATE",
"from": "",
"to": "0x00000000000Fb5C9ADea0298D729A0CB3823Cc07",
"metadata": "Deploy Deposit Wallet"
}'
```
The response includes the Relayer transaction ID.
```json Response theme={null}
{
"transactionID": "",
"state": "STATE_NEW"
}
```
Then, poll the Relayer transaction until it reaches `STATE_CONFIRMED`.
```bash theme={null}
curl "https://relayer-v2.polymarket.com/transaction?id="
```
The confirmed transaction includes the new Deposit Wallet address as `proxyAddress`.
```json Response theme={null}
[
{
"transactionID": "",
"transactionHash": "",
"proxyAddress": "",
"state": "STATE_CONFIRMED"
}
]
```
Treat `STATE_FAILED` and `STATE_INVALID` as terminal failures.
Then, create an L1 signature to attest to ownership of the signer
address. See [API Authentication](/getting-started/api#authentication)
for the complete signing flow.
```json clobAuthTypedData theme={null}
{
"domain": {
"name": "ClobAuthDomain",
"version": "1",
"chainId": 137
},
"types": {
"ClobAuth": [
{ "name": "address", "type": "address" },
{ "name": "timestamp", "type": "string" },
{ "name": "nonce", "type": "uint256" },
{ "name": "message", "type": "string" }
]
},
"primaryType": "ClobAuth",
"message": {
"address": "",
"timestamp": "",
"nonce": "",
"message": "This message attests that I control the given wallet"
}
}
```
Sign `clobAuthTypedData` with the signer that controls ``. The returned signature is ``.
Finally, create L2 credentials by sending the signer address,
timestamp, nonce, and L1 signature to the CLOB.
```bash Create theme={null}
curl -X POST "https://clob.polymarket.com/auth/api-key" \
-H "POLY_ADDRESS: " \
-H "POLY_SIGNATURE: " \
-H "POLY_TIMESTAMP: " \
-H "POLY_NONCE: "
```
```bash Derive theme={null}
curl "https://clob.polymarket.com/auth/derive-api-key" \
-H "POLY_ADDRESS: " \
-H "POLY_SIGNATURE: " \
-H "POLY_TIMESTAMP: " \
-H "POLY_NONCE: "
```
Store the returned L2 credentials for authenticated requests and order placement.
```json Response theme={null}
{
"apiKey": "",
"secret": "",
"passphrase": ""
}
```
That's it—you have created the new account.
## Execute Gasless Transactions
Approve token spending, transfer funds, and manage positions from the account
wallet without paying gas.
`SecureClient` provides named methods for supported wallet actions. Each
method returns a `TransactionHandle`; call `.wait()` to wait for the action
to settle.
Create a `SecureClient` with either a Relayer or Builder API key:
```ts Relayer API Key theme={null}
import { createSecureClient, relayerApiKey } from "@polymarket/client";
const client = await createSecureClient({
signer,
wallet: process.env.POLYMARKET_WALLET_ADDRESS,
apiKey: relayerApiKey({
key: process.env.POLYMARKET_RELAYER_API_KEY!,
address: process.env.POLYMARKET_RELAYER_API_KEY_ADDRESS!,
}),
});
```
```ts Builder API Key theme={null}
import { createSecureClient } from "@polymarket/client";
import { builderApiKey } from "@polymarket/client/node";
const client = await createSecureClient({
signer,
wallet: process.env.POLYMARKET_WALLET_ADDRESS,
apiKey: builderApiKey({
key: process.env.POLYMARKET_BUILDER_API_KEY!,
secret: process.env.POLYMARKET_BUILDER_SECRET!,
passphrase: process.env.POLYMARKET_BUILDER_PASSPHRASE!,
}),
});
```
Use the method that matches the wallet action you want to perform:
| Action | Method | Documentation |
| ------------------------------ | -------------------------- | ----------------------------------------------------- |
| Approve ERC-20 spending | `approveErc20()` | Below |
| Approve an ERC-1155 operator | `approveErc1155ForAll()` | Below |
| Transfer ERC-20 tokens | `transferErc20()` | Below |
| Set up trading approvals | `setupTradingApprovals()` | [Set Up Trading Approvals](#set-up-trading-approvals) |
| Split, merge, or redeem tokens | Position lifecycle methods | [Manage Positions](/trading/positions/manage) |
| Fund a Perps account | `depositToPerps()` | [Fund Your Account](/perps/fund-your-account) |
**Approve ERC-20 spending**
Set an allowance for a contract to spend an ERC-20 token from the account
wallet. Pass `"max"` to approve the maximum amount.
```ts theme={null}
const approval = await client.approveErc20({
tokenAddress: "",
spenderAddress: "",
amount: "max",
});
await approval.wait();
```
**Approve an ERC-1155 operator**
Allow an operator to manage every ERC-1155 token held by the account wallet.
Set `approved` to `false` to revoke access.
```ts theme={null}
const approval = await client.approveErc1155ForAll({
tokenAddress: "",
operatorAddress: "",
approved: true,
});
await approval.wait();
```
**Transfer ERC-20 tokens**
Transfer an ERC-20 token from the account wallet. `amount` is expressed in the
token's base units.
```ts theme={null}
const transfer = await client.transferErc20({
tokenAddress: "",
recipientAddress: "",
amount: 1_000_000n,
});
await transfer.wait();
```
`AsyncSecureClient` provides named methods for supported wallet actions.
Each method returns a transaction handle; call `await handle.wait()` to
wait for the action to settle. The same methods are available on the
synchronous `SecureClient`.
Create an `AsyncSecureClient` with either a Relayer or Builder API key:
```python Relayer API Key theme={null}
import os
from polymarket import AsyncSecureClient, RelayerApiKey
client = await AsyncSecureClient.create(
private_key=os.environ["SIGNER_PRIVATE_KEY"],
wallet=os.environ["POLYMARKET_WALLET_ADDRESS"],
api_key=RelayerApiKey(
key=os.environ["POLYMARKET_RELAYER_API_KEY"],
address=os.environ["POLYMARKET_RELAYER_API_KEY_ADDRESS"],
),
)
```
```python Builder API Key theme={null}
import os
from polymarket import AsyncSecureClient, BuilderApiKey
client = await AsyncSecureClient.create(
private_key=os.environ["SIGNER_PRIVATE_KEY"],
wallet=os.environ["POLYMARKET_WALLET_ADDRESS"],
api_key=BuilderApiKey(
key=os.environ["POLYMARKET_BUILDER_API_KEY"],
secret=os.environ["POLYMARKET_BUILDER_SECRET"],
passphrase=os.environ["POLYMARKET_BUILDER_PASSPHRASE"],
),
)
```
Use the method that matches the wallet action you want to perform:
| Action | Method | Documentation |
| ------------------------------ | --------------------------- | ----------------------------------------------------- |
| Approve ERC-20 spending | `approve_erc20()` | Below |
| Approve an ERC-1155 operator | `approve_erc1155_for_all()` | Below |
| Transfer ERC-20 tokens | `transfer_erc20()` | Below |
| Set up trading approvals | `setup_trading_approvals()` | [Set Up Trading Approvals](#set-up-trading-approvals) |
| Split, merge, or redeem tokens | Position lifecycle methods | [Manage Positions](/trading/positions/manage) |
| Fund a Perps account | `deposit_to_perps()` | [Fund Your Account](/perps/fund-your-account) |
**Approve ERC-20 spending**
Set an allowance for a contract to spend an ERC-20 token from the account
wallet. Pass `"max"` to approve the maximum amount.
```python theme={null}
approval = await client.approve_erc20(
token_address="",
spender_address="",
amount="max",
)
await approval.wait()
```
**Approve an ERC-1155 operator**
Allow an operator to manage every ERC-1155 token held by the account wallet.
Set `approved` to `False` to revoke access.
```python theme={null}
approval = await client.approve_erc1155_for_all(
token_address="",
operator_address="",
approved=True,
)
await approval.wait()
```
**Transfer ERC-20 tokens**
Transfer an ERC-20 token from the account wallet. `amount` is expressed in the
token's base units.
```python theme={null}
transfer = await client.transfer_erc20(
token_address="",
recipient_address="",
amount=1_000_000,
)
await transfer.wait()
```
A Deposit Wallet executes one or more contract calls as an ordered batch.
The signer authorizes the complete batch, and the Relayer submits it
gaslessly.
The following steps show the Deposit Wallet path. For Safe or Proxy Wallet
flows, use an SDK that handles the wallet-specific payloads.
First, encode each contract call and add it to the batch in execution order.
```json theme={null}
[
{
"target": "",
"value": "0",
"data": ""
}
]
```
`target` is the contract to call, `value` is the amount of native POL to send in
wei, and `data` is the ABI-encoded function call. Use `"0"` for `value` when the
call does not transfer POL.
Then, fetch a fresh `WALLET` nonce for the signer using the API key for your
integration.
```bash Relayer API Key theme={null}
curl -G "https://relayer-v2.polymarket.com/v1/account/transactions/params" \
-H "RELAYER_API_KEY: " \
-H "RELAYER_API_KEY_ADDRESS: " \
--data-urlencode "address=" \
--data-urlencode "type=WALLET"
```
```bash Builder API Key theme={null}
curl -G "https://relayer-v2.polymarket.com/v1/account/transactions/params" \
-H "POLY_BUILDER_API_KEY: " \
-H "POLY_BUILDER_TIMESTAMP: " \
-H "POLY_BUILDER_PASSPHRASE: " \
-H "POLY_BUILDER_SIGNATURE: " \
--data-urlencode "address=" \
--data-urlencode "type=WALLET"
```
For Builder API keys, create `builder_signature` from the request timestamp,
method, and path. See [Create New Accounts](#create-new-accounts) for the
complete signing flow.
```json Response theme={null}
{
"address": "",
"nonce": ""
}
```
Build a Deposit Wallet `Batch` containing the wallet address, fresh nonce,
future deadline, and call list.
```json walletBatchTypedData theme={null}
{
"domain": {
"name": "DepositWallet",
"version": "1",
"chainId": 137,
"verifyingContract": ""
},
"types": {
"Call": [
{ "name": "target", "type": "address" },
{ "name": "value", "type": "uint256" },
{ "name": "data", "type": "bytes" }
],
"Batch": [
{ "name": "wallet", "type": "address" },
{ "name": "nonce", "type": "uint256" },
{ "name": "deadline", "type": "uint256" },
{ "name": "calls", "type": "Call[]" }
]
},
"primaryType": "Batch",
"message": {
"wallet": "",
"nonce": "",
"deadline": "",
"calls": [
{
"target": "",
"value": "0",
"data": ""
}
]
}
}
```
Sign the typed data with the signer that controls the Deposit Wallet. The
example below uses Viem.
```ts theme={null}
import { privateKeyToAccount } from "viem/accounts";
const signer = privateKeyToAccount(
process.env.SIGNER_PRIVATE_KEY as `0x${string}`,
);
const walletBatchSignature = await signer.signTypedData(walletBatchTypedData);
```
Submit the signed batch using the same call list and API key for your
integration.
```bash Relayer API Key theme={null}
curl -X POST "https://relayer-v2.polymarket.com/submit" \
-H "Content-Type: application/json" \
-H "RELAYER_API_KEY: " \
-H "RELAYER_API_KEY_ADDRESS: " \
-d '{
"type": "WALLET",
"from": "",
"to": "0x00000000000Fb5C9ADea0298D729A0CB3823Cc07",
"nonce": "",
"signature": "",
"metadata": "",
"depositWalletParams": {
"depositWallet": "",
"deadline": "",
"calls": [
{
"target": "",
"value": "0",
"data": ""
}
]
}
}'
```
```bash Builder API Key theme={null}
curl -X POST "https://relayer-v2.polymarket.com/submit" \
-H "Content-Type: application/json" \
-H "POLY_BUILDER_API_KEY: " \
-H "POLY_BUILDER_TIMESTAMP: " \
-H "POLY_BUILDER_PASSPHRASE: " \
-H "POLY_BUILDER_SIGNATURE: " \
-d '{
"type": "WALLET",
"from": "",
"to": "0x00000000000Fb5C9ADea0298D729A0CB3823Cc07",
"nonce": "",
"signature": "",
"metadata": "",
"depositWalletParams": {
"depositWallet": "",
"deadline": "",
"calls": [
{
"target": "",
"value": "0",
"data": ""
}
]
}
}'
```
For Builder API keys, sign the request timestamp, method, path, and exact
serialized body as described in [Create New Accounts](#create-new-accounts).
The response includes the transaction ID used in the next step.
```json Response theme={null}
{
"transactionID": "",
"state": "STATE_NEW"
}
```
Poll the transaction until it reaches `STATE_CONFIRMED`.
```bash Relayer API Key theme={null}
curl "https://relayer-v2.polymarket.com/v1/account/transactions/" \
-H "RELAYER_API_KEY: " \
-H "RELAYER_API_KEY_ADDRESS: "
```
```bash Builder API Key theme={null}
curl "https://relayer-v2.polymarket.com/v1/account/transactions/" \
-H "POLY_BUILDER_API_KEY: " \
-H "POLY_BUILDER_TIMESTAMP: " \
-H "POLY_BUILDER_PASSPHRASE: " \
-H "POLY_BUILDER_SIGNATURE: "
```
```json Response theme={null}
{
"transaction_id": "",
"transaction_hash": "",
"state": "STATE_CONFIRMED",
"error_msg": null
}
```
Treat `STATE_FAILED` and `STATE_INVALID` as terminal failures.
## Set Up Trading Approvals
Set up the ERC-20 and ERC-1155 approvals that allow Polymarket's exchange
contracts to spend the account wallet's pUSD and Conditional Tokens when
placing orders. For Deposit Wallets, Safe Wallets, and Proxy Wallets, these
approvals are submitted as a gasless transaction.
Create a `SecureClient` with either a Relayer or Builder API key:
```ts Relayer API Key theme={null}
import { createSecureClient, relayerApiKey } from "@polymarket/client";
const client = await createSecureClient({
signer,
wallet: process.env.POLYMARKET_WALLET_ADDRESS,
apiKey: relayerApiKey({
key: process.env.POLYMARKET_RELAYER_API_KEY!,
address: process.env.POLYMARKET_RELAYER_API_KEY_ADDRESS!,
}),
});
```
```ts Builder API Key theme={null}
import { createSecureClient } from "@polymarket/client";
import { builderApiKey } from "@polymarket/client/node";
const client = await createSecureClient({
signer,
wallet: process.env.POLYMARKET_WALLET_ADDRESS,
apiKey: builderApiKey({
key: process.env.POLYMARKET_BUILDER_API_KEY!,
secret: process.env.POLYMARKET_BUILDER_SECRET!,
passphrase: process.env.POLYMARKET_BUILDER_PASSPHRASE!,
}),
});
```
Call `setupTradingApprovals()` to configure the required allowances:
```ts theme={null}
await client.setupTradingApprovals();
```
The method checks existing approvals and submits only what is missing, so it is safe to call more than once.
Order placement can recover from missing allowances automatically. Setting them up in advance keeps that work out of your first order.
Create an `AsyncSecureClient` with either a Relayer or Builder API key (the
same workflow is available with the synchronous `SecureClient`):
```python Relayer API Key theme={null}
import os
from polymarket import AsyncSecureClient, RelayerApiKey
client = await AsyncSecureClient.create(
private_key=os.environ["SIGNER_PRIVATE_KEY"],
wallet=os.environ["POLYMARKET_WALLET_ADDRESS"],
api_key=RelayerApiKey(
key=os.environ["POLYMARKET_RELAYER_API_KEY"],
address=os.environ["POLYMARKET_RELAYER_API_KEY_ADDRESS"],
),
)
```
```python Builder API Key theme={null}
import os
from polymarket import AsyncSecureClient, BuilderApiKey
client = await AsyncSecureClient.create(
private_key=os.environ["SIGNER_PRIVATE_KEY"],
wallet=os.environ["POLYMARKET_WALLET_ADDRESS"],
api_key=BuilderApiKey(
key=os.environ["POLYMARKET_BUILDER_API_KEY"],
secret=os.environ["POLYMARKET_BUILDER_SECRET"],
passphrase=os.environ["POLYMARKET_BUILDER_PASSPHRASE"],
),
)
```
Call `setup_trading_approvals()` to configure the required allowances:
```python theme={null}
await client.setup_trading_approvals()
```
The method checks existing approvals and submits only what is missing, so it is safe to call more than once.
Order placement can recover from missing allowances automatically. Setting them up in advance keeps that work out of your first order.
Configure both CLOB exchange contracts so a Deposit Wallet can buy and sell
in standard and neg-risk markets.
The following steps show the Deposit Wallet path. For Safe or Proxy Wallet
flows, use an SDK that handles the wallet-specific payloads. For EOA trading,
see [Set Up EOA Trading](#set-up-eoa-trading).
First, check each allowance before building the transaction so the batch
contains only missing approvals.
| Token | Contract to approve | Contract call |
| ------------------ | ------------------- | ------------------------------------------- |
| pUSD | Standard Exchange | `approve(StandardExchange, maxUint256)` |
| pUSD | Neg Risk Exchange | `approve(NegRiskExchange, maxUint256)` |
| Conditional Tokens | Standard Exchange | `setApprovalForAll(StandardExchange, true)` |
| Conditional Tokens | Neg Risk Exchange | `setApprovalForAll(NegRiskExchange, true)` |
Read the current values with `allowance(wallet, exchange)` on pUSD and `isApprovedForAll(wallet, exchange)` on Conditional Tokens.
| Contract | Address |
| ------------------ | -------------------------------------------- |
| pUSD | `0xC011a7E12a19f7B1f670d46F03B03f3342E82DFB` |
| Conditional Tokens | `0x4D97DCd97eC945f40cF65F87097ACe5EA0476045` |
| Standard Exchange | `0xE111180000d2663C0091e4f400237545B87B996B` |
| Neg Risk Exchange | `0xe2222d279d744050d28e00520010520000310F59` |
Then, encode the missing ERC-20 and ERC-1155 approval calls.
```solidity ERC-20 Approval theme={null}
function approve(address spender, uint256 amount) returns (bool);
```
```solidity ERC-1155 Approval theme={null}
function setApprovalForAll(address operator, bool approved);
```
Build one call for each missing approval. This example includes all four.
```json theme={null}
[
{
"target": "0xC011a7E12a19f7B1f670d46F03B03f3342E82DFB",
"value": "0",
"data": ""
},
{
"target": "0xC011a7E12a19f7B1f670d46F03B03f3342E82DFB",
"value": "0",
"data": ""
},
{
"target": "0x4D97DCd97eC945f40cF65F87097ACe5EA0476045",
"value": "0",
"data": ""
},
{
"target": "0x4D97DCd97eC945f40cF65F87097ACe5EA0476045",
"value": "0",
"data": ""
}
]
```
Use the approval call list as the `calls` in [Execute Gasless
Transactions](#execute-gasless-transactions). Fetch a fresh nonce, sign the
complete batch, submit it, and wait for `STATE_CONFIRMED` before continuing.
Finally, update the CLOB allowance cache:
```bash Collateral theme={null}
curl -G "https://clob.polymarket.com/balance-allowance/update" \
-H "POLY_ADDRESS: " \
-H "POLY_SIGNATURE: " \
-H "POLY_TIMESTAMP: " \
-H "POLY_API_KEY: " \
-H "POLY_PASSPHRASE: " \
--data-urlencode "asset_type=COLLATERAL" \
--data-urlencode "signature_type=3"
```
```bash Conditional Token theme={null}
curl -G "https://clob.polymarket.com/balance-allowance/update" \
-H "POLY_ADDRESS: " \
-H "POLY_SIGNATURE: " \
-H "POLY_TIMESTAMP: " \
-H "POLY_API_KEY: " \
-H "POLY_PASSPHRASE: " \
--data-urlencode "asset_type=CONDITIONAL" \
--data-urlencode "token_id=" \
--data-urlencode "signature_type=3"
```
Using the signer address and CLOB API credentials from [API
Authentication](/getting-started/api#authentication), create a fresh
`` and generate `` without a request
body. The query parameters are not part of the signed path:
```text theme={null}
message = + "GET" + "/balance-allowance/update"
clob_l2_signature = urlsafeBase64WithPadding(
HMAC-SHA256(base64Decode(), message)
)
```
Refresh the conditional-token allowance for each token before its first sell order.
***
## Advanced Options
Explore additional wallet and authentication patterns for advanced integrations.
### Derive a Deposit Wallet Address
If you need to compute a Deposit Wallet address before deployment, use the
deterministic derivation algorithm below.
Deposit Wallets deployed before the June 29, 2026 upgrade use a UUPS proxy.
Deposit Wallets deployed after the upgrade use a beacon proxy. The following
algorithm derives the address for a new Deposit Wallet with a beacon proxy.
```text theme={null}
factory = 0x00000000000Fb5C9ADea0298D729A0CB3823Cc07
beacon = 0x7A18EDfe055488A3128f01F563e5B479D92ffc3a
walletId = bytes32(signer) // left-pad the signer to 32 bytes
args = abi.encode(factory, walletId)
salt = keccak256(args)
beaconInitCodeHash = SoladyLibClone.initCodeHashERC1967BeaconProxy(beacon, args)
depositWallet = CREATE2(factory, salt, beaconInitCodeHash)
```
See [Contract Addresses](/resources/contracts#wallet-factory-contracts) for the
current Deposit Wallet factory and beacon.
### Set Up EOA Trading
If your EOA is allowlisted for trading, use it as the account wallet. Every
onchain action—including token approvals, ERC-20 transfers, splits, merges, and
redemptions—is submitted directly from the EOA and requires POL for gas.
Pass the signer address as `wallet`. The SDK identifies the account as an
EOA and skips Deposit Wallet deployment.
```ts theme={null}
import { createSecureClient } from "@polymarket/client";
import { privateKey } from "@polymarket/client/viem";
const signer = privateKey(process.env.SIGNER_PRIVATE_KEY);
const client = await createSecureClient({
signer,
wallet: await signer.getAddress(),
});
```
Methods such as `approveErc20()`, `approveErc1155ForAll()`, `transferErc20()`,
and the position lifecycle methods submit transactions directly from the
signer. For example, set up every required trading approval:
```ts theme={null}
await client.setupTradingApprovals();
```
Pass the signer address as `wallet`. The SDK identifies the account as an
EOA and skips Deposit Wallet deployment.
```python theme={null}
import os
from polymarket import AsyncSecureClient
client = await AsyncSecureClient.create(
private_key=os.environ["SIGNER_PRIVATE_KEY"],
wallet=os.environ["POLYMARKET_SIGNER_ADDRESS"],
)
```
Methods such as `approve_erc20()`, `approve_erc1155_for_all()`,
`transfer_erc20()`, and the position lifecycle methods submit transactions
directly from the signer. For example, set up every required trading approval:
```python theme={null}
await client.setup_trading_approvals()
```
First, approve both CLOB exchange contracts to spend pUSD and manage
Conditional Tokens. Submit each required approval transaction from the
EOA and pay gas with POL held at that address.
See [Set Up Trading Approvals](#set-up-trading-approvals) for the required approvals and contract addresses.
Then, create an L1 signature to attest to ownership of the EOA. See [API
Authentication](/getting-started/api#authentication) for the complete
signing flow.
```json clobAuthTypedData theme={null}
{
"domain": {
"name": "ClobAuthDomain",
"version": "1",
"chainId": 137
},
"types": {
"ClobAuth": [
{ "name": "address", "type": "address" },
{ "name": "timestamp", "type": "string" },
{ "name": "nonce", "type": "uint256" },
{ "name": "message", "type": "string" }
]
},
"primaryType": "ClobAuth",
"message": {
"address": "",
"timestamp": "",
"nonce": "",
"message": "This message attests that I control the given wallet"
}
}
```
Sign `clobAuthTypedData` with the EOA. The returned signature is ``.
Finally, create L2 credentials by sending the signer address,
timestamp, nonce, and L1 signature to the CLOB.
```bash Create theme={null}
curl -X POST "https://clob.polymarket.com/auth/api-key" \
-H "POLY_ADDRESS: " \
-H "POLY_SIGNATURE: " \
-H "POLY_TIMESTAMP: " \
-H "POLY_NONCE: "
```
```bash Derive theme={null}
curl "https://clob.polymarket.com/auth/derive-api-key" \
-H "POLY_ADDRESS: " \
-H "POLY_SIGNATURE: " \
-H "POLY_TIMESTAMP: " \
-H "POLY_NONCE: "
```
Store the returned L2 credentials for authenticated requests and order placement.
```json Response theme={null}
{
"apiKey": "",
"secret": "",
"passphrase": ""
}
```
See [Place a Limit Order](/trading/place-orders#place-a-limit-order) for the
complete direct API order flow.
### Remote Builder Signing
Remote Builder Signing keeps Builder API credentials on your server while a TypeScript client requests signed headers for Builder-authenticated actions.
Authenticate and authorize the caller on your server, then sign the request
details supplied by the client.
```ts theme={null}
import { buildHmacSignature } from "@polymarket/client";
export async function POST(request: Request): Promise {
const { body, method, path } = await request.json();
const timestamp = Math.floor(Date.now() / 1000);
return Response.json({
POLY_BUILDER_API_KEY: process.env.POLYMARKET_BUILDER_API_KEY!,
POLY_BUILDER_PASSPHRASE: process.env.POLYMARKET_BUILDER_PASSPHRASE!,
POLY_BUILDER_SIGNATURE: await buildHmacSignature(
process.env.POLYMARKET_BUILDER_SECRET!,
timestamp,
method,
path,
body,
),
POLY_BUILDER_TIMESTAMP: `${timestamp}`,
});
}
```
Pass the user's signer and the signing endpoint to the client. Authenticate
signing requests with the application's session credentials or custom
headers.
```ts Cookie Session theme={null}
import { createSecureClient, remoteBuilderSigning } from "@polymarket/client";
const client = await createSecureClient({
signer,
apiKey: remoteBuilderSigning({
url: "/api/builder/sign",
credentials: "include",
}),
});
```
```ts Custom Headers theme={null}
import { createSecureClient, remoteBuilderSigning } from "@polymarket/client";
const client = await createSecureClient({
signer,
apiKey: remoteBuilderSigning({
url: "/api/builder/sign",
headers: {
Authorization: "Bearer eyJhbGciOiJIUzI1NiJ9.…",
},
}),
});
```
The Builder API credentials remain on the server; the client receives only the headers for the request being authorized.
### Opt Out of Beacon Upgrades
Deposit Wallets deployed after June 29, 2026 use an [ERC-1967 beacon
proxy](https://eips.ethereum.org/EIPS/eip-1967#beacon-contract-address). This
proxy pattern resolves the implementation for multiple wallets through a shared
beacon, allowing Polymarket to send implementation upgrades without changing
their addresses. The wallet owner can instead pin the wallet to the
implementation that is current when it opts out. The owner-only calls below are
submitted directly and require POL for gas.
An opted-out wallet does not receive future security fixes, bug fixes, or
features delivered through beacon upgrades. Review the current implementation
and accept responsibility for maintaining the wallet before opting out.
Send a direct onchain transaction from the wallet owner to call `pause()` on
the Deposit Wallet.
Read `timelockDelay()` from the Deposit Wallet factory and wait until that
interval has elapsed after the wallet was paused.
Send another transaction from the wallet owner to call `optOut()` on the
Deposit Wallet. This pins the wallet to the beacon implementation that is
current when the transaction executes.
Call `unpause()` from the wallet owner to clear the paused state.
To resume receiving beacon upgrades, repeat the pause and timelock steps, call
`optIn()`, and then unpause the wallet. Review the beacon's current default
implementation before opting back in.